What is the Default Upload File Size Limit in WordPress?
Many think WordPress limits file uploads to 2 MB, but actually, it doesn’t set any file size limits at all.
The size limit actually comes from your hosting server, which controls settings like upload_max_filesize and post_max_size. In this guide, I’ll show you how to increase the upload limit on different hosting environments like localhost, cPanel, and GoDaddy.
How to Check Your Current Upload Limit
To find your current upload limit in WordPress, you can use one of the following methods:
1. WordPress Dashboard
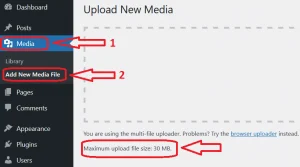
Go to your WordPress admin area. Navigate to Media >> Add New. You’ll see the maximum upload file size limit displayed below the upload area. See the image below for a visual reference.
2. Using `phpinfo()`
- Create a new PHP file (e.g., `info.php`) in your website’s root directory.
- Add the following code to the file:
<?php
phpinfo();- Open this file in your browser (for example – `yoursite.com/info.php`), and search for ‘upload_max_filesize‘ and ‘post_max_size‘ to see your server’s current limits.
This will give you an accurate view of your current upload restrictions based on your server configuration.
Methods to Increase Maximum Upload File Size in WordPress
There are several ways to increase the maximum upload file size limit in WordPress, depending on your hosting setup. Below are the most common methods:
Through cPanel
If your site is hosted on a server with cPanel, you can change the limit directly through the dashboard.
- Log in to cPanel and find MultiPHP INI Editor
- Select your domain and adjust the values for `upload_max_filesize` and `post_max_size` to your desired limits (e.g., 64M).
- Save the changes, and the new limits should take effect immediately.
This guide is only applicable if your cPanel includes access to MultiPHP INI Editor.
If the tool is not available contact your hosting support to increase the limits, or you can try adjusting limits via the .htaccess or php.ini
On GoDaddy
For GoDaddy hosting, the process is similar to cPanel.
- Access the GoDaddy cPanel and navigate to MultiPHP INI Editor.
- Choose your domain, and increase the values for `upload_max_filesize` and `post_max_size`
- Save the changes.
Editing php.ini File
This method works on localhost or if you have direct access to this file on your hosting server. Most shared hosting providers don’t give direct access to the main php.ini file for security reasons. This method is commonly used in:
- Local development environments (XAMPP, MAMP, etc.)
- VPS (Virtual Private Server)
- Dedicated hosting
- Managed WordPress hosting that provides direct php.ini access
Where to Find php.ini
- On localhost:
- XAMPP:
C:\xampp\php\php.ini - MAMP:
/Applications/MAMP/conf/php[version]/php.ini - WampServer:
C:\wamp\bin\php\php[version]\php.ini
- XAMPP:
- On hosting server:
- Usually in
/etc/php.inior/etc/php/[version]/php.ini - Some hosts might place it in custom locations
- You may need FTP or File Manager access to locate it
- Usually in
Steps to Modify
- Backup your original php.ini file
- Open php.ini in a text editor
- Find these parameters (use search function):
upload_max_filesize = 64M
post_max_size = 64M - Modify the values as needed
- Save the file
- Restart your web server to apply changes:
- Apache:
service apache2 restart - XAMPP: Restart from control panel
- MAMP: Restart servers from MAMP application
- Apache:
Important Notes
- Always make a backup before editing
- post_max_size should be larger than upload_max_filesize
- Values can use M (megabytes) or G (gigabytes) suffix
- If you don’t see changes after saving, check:
- If you edited the correct php.ini file
- If web server was properly restarted
- PHP version being used
Modifying PHP Limits via .htaccess File
The .htaccess method is often the most accessible option for shared hosting users since most hosting providers allow modification of this file. But it only works on servers running Apache, for Nginx servers, this method is not applicable.
- Backup First
- Download your existing .htaccess file
- Store the backup on your computer
- Edit .htaccess
- Find .htaccess in your WordPress root directory
- Add this code at the top:
# BEGIN PHP Upload Limits
php_value upload_max_filesize 64M
php_value post_max_size 64M
php_value memory_limit 256M
php_value max_execution_time 300
php_value max_input_time 300
# END PHP Upload Limits
If the above doesn’t work, try this alternative:
# BEGIN PHP Upload Limits
<IfModule mod_php.c>
    php_value upload_max_filesize 64M
    php_value post_max_size 64M
    php_value memory_limit 256M
    php_value max_execution_time 300
    php_value max_input_time 300
</IfModule>
# END PHP Upload Limits
- After Changes
- Clear your WordPress cache
- Test uploading a large file
- If you get a 500 error, remove the changes immediately
If none of the methods work, contact your hosting provider’s support team for assistance. Keep in mind that file upload limits are determined by the server environment, not the application itself. This method applies to all types of websites hosted on Apache servers, not just WordPress sites.